Why Pineapple Hill?

The pineapple has been a symbol of hospitality since the days of the early American colonies. According to legend, the symbol began with the sea captains of New England who would spear a pineapple on a fence post outside their home to let the community know of their safe return home and to invite friends to visit and share their hospitality.

Likewise, we hope Pineapple Hill Designs boutique will make you feel “Welcome”! We know how important it is to find something special for that certain someone or just the right accessory to complete a room. We believe everyday is a day to celebrate, and we have just the thing to help you create something special out of the ordinary.

Tuesday, December 14, 2010

Tuesday Tip - Roll Out Cookies

  "10-Minute Roll Out Cookies"

FREEZE: Roll-out cookies – all the fun, none of the fuss.

via King Arthur Flour Blog


Want to have ginger snowmen, fresh-baked and ready to decorate, in just 10 minutes?
Sure you do! Who wouldn’t, given the hectic schedules we all pursue at this time of the year.
Between work and holiday shopping, chores and holiday shopping, errands and holiday shopping – and holiday shopping – who has time for making cookie dough, rolling it out, cutting, carefully transferring cutouts to cookie sheets, baking, cooling…
You do!
The secret?
Doing all the heavy lifting ahead of time. Having cookies all cut out and ready to pop into the oven the moment the kids come home (or the grandchildren show up).
By the time you get the icing and sprinkles organized, and the kids settled, the cookies will be baked, cooled, and ready to ice.
No way!
Yes, absolutely. Thanks to the modern miracle of electricity and freezers, you, yes you, can cut out your cookie angels, snowmen, and stars ahead of time, freeze them, then pop them in the oven whenever you’re ready.
Don’t care to fuss? This technique works fine for any rollout cookie; no need to frost or decorate.
And how about chocolate chip, oatmeal, peanut butter, and all your other favorites?
Yes, they’re easily made ahead and frozen. Twenty minutes after unexpected guests arrive, you can ask, “Can I offer you a nice warm cookie, just out of the oven?“
Now THAT’S hospitality! 
Place the following in a mixing bowl, and beat until combined:
1/2 cup butter
1/2 cup vegetable shortening
3/4 cup light brown sugar, packed
1/2 cup granulated sugar
1 1/2 teaspoons baking powder
1 1/2 teaspoons cinnamon
1 1/2 teaspoons ground ginger
1/2 teaspoon ground allspice or ground cloves
3/4 teaspoon salt
Add 1 large egg, and 2 tablespoons molasses.
Beat until smooth. Amazing how that one egg smooths things out, eh?
Add 1 1/2 cups King Arthur Unbleached All-Purpose Flour. Mix until thoroughly combined, then add an additional 1 1/2 cups flour, for a total of 3 cups. Add 3 tablespoons cornstarch, along with the second batch of flour.
Mix to combine.
See how dry this looks? Scrape the bowl, and continue to mix…
…until everything looks well mixed, with no dry spots.
Divide the dough in half, flattening each half slightly to make a disk. Wrap in plastic, and refrigerate for 1 hour, or overnight. This chilling period will make the dough easier to handle.
Preheat the oven to 350°F.
Take one piece of dough out of the refrigerator, and place it on a piece of half-sheet parchment (16 1/2” x 12 1/4”).
If you don’t have parchment, place the dough on a lightly floured work surface.
Roll it 1/8” to 1/4” thick. A thinner cookie will be crisper; a thicker cookie, more solid/soft (though not bendy soft; just softer than crisp).
Draw a mental line down the center of the sheet; or actually cut your dough in half, using a knife or pizza cutter. Your goal is to cut cookies that will fall  on one or the other half of the paper; you’ll see why in a minute.
Cut out cookies, removing and saving the dough between them. You’ll re-roll and cut these scraps.
As the dough gets warmer, it gets trickier to remove the crooked, awkward pieces of dough in between cutouts; a toothpick helps.
Now, take a pair of scissors and cut that sheet of parchment right down the middle.
If you like, you can start with a half-sheet of parchment, rather than rolling on a full sheet and then cutting; you’ll just need to use a smaller piece of dough.
As you continue to roll out dough and cut cookies, lay the sheets of cookies into a 9” x 13” pan. Continue until you’ve used all the dough.
If you prefer rolling cookies on a floured surface, you can pick them up and transfer them to the parchment in the pan. If you don’t have parchment, substitute waxed paper or foil.
Why roll directly on the parchment? It’s great for sticky dough, and/or intricate shapes. It’s easier to pick up a piece of parchment with cutout cookies than it is to successfully move delicate cookies from your rolling surface to a pan.
Next, cover the pan with plastic wrap (or a shower cap), and place it in the freezer. Once the cookies are frozen, you can leave the pan in the freezer; or, to save space (and get your pan back), remove the pan from the freezer, quickly peel the cookies off the parchment, and store them in a zip-top bag.
I say quickly because you don’t want cookies defrosting and getting soft; they’ll stick together in the bag.
Ready to bake?
Remove the cookies from the freezer. If you’ve kept them on the parchment, simply transfer cookies, parchment and all, to a baking sheet.
If the frozen cookies have been bagged, take the bag out of the freezer, and quickly place the frozen cookies on a parchment-lined baking sheet.
Do you see the word “parchment” being used constantly here? It’s the test kitchen’s best friend – and it should be yours, too. There’s nothing like parchment for keeping pans clean, moving stuff around, storage, preventing sticking, and a host of other uses.
A single piece of parchment can be used over and over again, too. What’s not to like?!
Bake the cookies just until they’re slightly brown around the edges, or until they feel firm, about 10 to 13 minutes.
Remove them from the oven.
See how the edges are just slightly brown? It’s easier to see on the right of these cookies.
When the cookies are completely cool, you can choose to decorate them – or not.
I have a huge personal antipathy towards decorated cookies; the process ratchets my stress level WAY too high. So I prevailed upon my long-time buddy and fellow test-kitchen baker, Sue Gray, to do some simple decorating as I took the photos.
First, Sue whipped up some royal icing (honestly, it took her like 2 minutes), and put it in a plastic piping bag. After adding a small, plain tip, she was ready to go. She piped lines on the snowman’s hat, and sprinkled with black sparkling sugar
…then shook Frosty to get rid of any excess sugar.
Next, she piped a face, and buttons…
…and a scarf, which she sprinkled with red sugar.
After shaking off the excess, she used a paintbrush to clean Frosty’s face.
Decorating like this isn’t hard, honestly; I just don’t have the patience (nor artistic bent) for it. So – thanks, Sue!
“Hey, how did she make that sparkling sugar stick onto the guy on the right?”
Brush the baked snowman lightly with corn syrup, honey, or maple syrup thinned with a bit of water; immediately sprinkle with sugar, shaking off any excess.


signature,pineapple hill
Photobucket
Share |

Monday, December 13, 2010

New Contest

Pineapple Hill is participating in a fun give-away with a Houston Photographer ,
Baldwin Photography
You can check it out 


signature,pineapple hill
Photobucket

Snowman Cupcakes

Snowman Cupcakes

Too cold to make a snowman outside? Gather the kids and create your own snowmen in the warmth of your kitchen!

via Land O'Lakes

Cupcakes

1 (18.25-ounce) package chocolate or Devil’s food cake mix
1/2 cup Land O Lakes® Butter, melted
3 Land O Lakes® All-Natural Eggs
1 1/4 cups buttermilk*

Frosting

3/4 cup Land O Lakes® Butter, softened
1 cup powdered sugar
1 teaspoon vanilla
1 (7-ounce) jar marshmallow crème

Decorations

3/4 cup sweetened flaked coconut, if desired
24 large marshmallows
Black decorator gel
Gumdrops
Fruit leather or fruit strips
Gummi candies, rings, disks, etc.

Directions


Heat oven to 350°F. Place paper baking cups into 24 muffin pan cups; set aside.

Combine all cupcake ingredients in large bowl; beat at medium speed until well mixed.

Fill prepared muffin cups 2/3 full. Bake for 18 to 20 minutes or until toothpick inserted into center comes out clean. Remove to wire cooling rack. Cool completely.

Place 3/4 cup butter into medium bowl; beat at medium speed until creamy. Add powdered sugar and vanilla; continue beating until well mixed. Add marshmallow crème; continue beating until well mixed. Frost 12 cupcakes. (The remaining 12 cupcakes can be eaten as is or frozen in a container with a tight-fitting lid for future use.)

Place coconut in shallow bowl, if desired. Roll edge of each frosted cupcake in coconut.

To create snowmen, use 1 marshmallow for head and 1 for body. Draw eyes and mouth on marshmallow head using black decorator gel. Using toothpick, poke hole into marshmallow for nose; insert small piece of gumdrop into hole. Draw buttons on marshmallow body using black decorator gel. To make scarf, cut 2 (2x1/2-inch) strips of fruit leather, make “V” shape notch in 1 end of each strip.

To assemble snowmen, place small amount of frosting on top of marshmallow body; place ends of 2 scarf pieces on frosting. Place small amount of frosting on scarf pieces; place marshmallow head on top. Create hat using decorator candies or gumdrops; attach to head using small amount of frosting.

Insert 2 toothpicks into bottom end of body, pushing through into head and leaving enough toothpick ends to insert into cupcake. Place snowmen on cupcakes, securing with toothpicks.


Recipe Tip


Place cupcakes on large platter covered with decorator sugar or coconut to create a winter wonderland centerpiece for your gathering.

signature,pineapple hill
Photobucket

Sunday, December 12, 2010

Peppermint Whoopie Pies

Peppermint Whoopie Pies

via The Real Butter Blog


Servings: Makes 3 dozen sandwich cookies
Ingredients:
Cookies:
2 cups flour
1/2 cup cocoa powder
1 teaspoon baking powder
1 teaspoon baking soda
1 teaspoon salt
1/2 cup (1 stick) butter
1 cup brown sugar, packed
1 egg
1 teaspoon pure vanilla extract
1/2 teaspoon peppermint extract
1 cup buttermilk
Filling:
1/2 cup (1 stick) butter, softened
1 7.5-ounce jar marshmallow fluff
2 teaspoons pure vanilla extract
1 1/4 cups powdered sugar
1 cup crushed peppermint candies (about 50 peppermint discs)
Cooking Directions:
Preheat oven to 350°F. In medium bowl, combine flour, cocoa powder, baking powder, baking soda and salt; set aside.
In large bowl, cream butter and brown sugar with electric mixer until light and fluffy. Add egg and extracts; mix well. Slowly add flour mixture and buttermilk, alternating, beginning and ending with flour mixture. Cover dough and chill at least 30 minutes.
Drop dough by rounded tablespoons onto parchment-lined baking sheet, placing cookies 2 inches apart. Bake cookies 9 to 12 minutes, or until firm. Cool cookies on pan 3 to 5 minutes or until set, then transfer to wire rack to cool completely.
For filling, in large bowl, cream together butter, fluff, and vanilla extract until light and fluffy. Add powdered sugar slowly; mix well. Spread flat side of half the cookies with heaping tablespoon of filling; top with second cookie to create sandwich. Roll edges in crushed peppermint candies; chill cookies to set filling.
Store unfilled cookies and filling in airtight containers in refrigerator for up to 1 week, and filled cookies for up to 3 days. Bring cookies to room temperature before serving.


signature,pineapple hill
Photobucket

Tuesday, November 30, 2010

Tuesday Tip - Christmas Lights

Lights in a Tangle?

Garden Hose Holder as Holiday Light Organizer

Coil strings of holiday lights round and round for knot-free hall decking. Your reward: You won’t blow a fuse trying to hang next year’s light show.


signature,pineapple hill
Photobucket
Share |

Monday, November 29, 2010

The Wish Wreath


The Wish Wreath
photo by  Melanie Acevedo
Hang an unadorned twig wreath in a spot where guests can’t miss it. Set out red Magic Markers and small plain cards on a table next to it. Post a little sign asking visitors to scribble a greeting or a wish for the upcoming New Year, along with their names, and have them slip the notes into the wreath.


signature,pineapple hill
Photobucket

Monday, November 22, 2010

So Sweet Potato~

 I love that you're rated

#1 by Nutritionist, because I 'm so in lve with you!

{A nutritional All-Star — one of the best vegetables you can eat. They're loaded with carotenoids, vitamin C, potassium, and fiber.}

Sweet-Potato Gratin

via Real Simple

Ingredients

  • 5 tablespoons unsalted butter
  • 1 large onion, chopped (about 2 cups)
  • 1/2 cup all-purpose flour
  • 2 cups whole milk
  • 1 tablespoon fresh rosemary leaves, chopped
  • 1 teaspoon kosher salt
  • freshly ground black pepper
  • 3 large sweet potatoes, peeled and shredded (about 4 1/2 cups)
  • 2 cups Cheddar, shredded (8 ounces)
  • 1 slice whole-wheat bread, ground in a food processor (1/2 cup)

Directions

  1. Heat oven to 400º F.
  2. Lightly coat a 9-inch square baking dish with vegetable cooking spray.
  3. In a medium saucepan, over medium heat, melt the butter and add the onion; cook until softened, about 10 minutes. Remove from heat, stir in the flour, then whisk in the milk, rosemary, salt, and a few grinds of pepper. Heat to boiling, whisking constantly. Stir in the sweet potatoes.
  4. Transfer to the baking dish and sprinkle with the Cheddar and bread crumbs. Bake for 30 minutes or until golden

signature,pineapple hill
Photobucket

Friday, November 19, 2010

Someone is Calling for Me


HOTCAKES with DELICIOUS BLUEBERRY COMPOTE
Recipe from Curtis Stone

 
via The Barefoot Contessa


BLUEBERRY COMPOTE
(Serves 4)
18 ounces fresh blueberries
1/4 cup sugar
Grated zest and juice of 1 lemon
1/4 cup coarsely chopped fresh mint leaves (optional)
HOTCAKES
1 cup fresh ricotta cheese
4 large eggs, separated
3/4 cup buttermilk, shaken
1 cup all-purpose flour
1 1/2 teaspoons baking powder
Pinch of salt
1/4 cup sugar
1/2 cup fresh blueberries
About 3 tablespoons unsalted butter
Butter, for serving
1. To make the blueberry compote: Combine the blueberries, sugar, lemon zest, and 2 tablespoons of the lemon juice in a medium saucepan over medium heat and cook for 2 minutes, or until the sugar dissolves. (Don't let the berries cook too long or they will become mushy and lose their beautiful shape. Doesn't that sound awful!....I'm glad we're talking about berries♥.) Remove from the heat. Gently stir in the chopped mint if using. Keep warm.
2. To make the hotcakes: Whisk the ricotta and the egg yolks together in a large bowl; then whisk in the buttermilk. Sift the flour, baking powder, and salt into the ricotta mixture. Stir with a whisk until just combined.
3. Using an electric mixer, beat the egg whites and sugar in a large bowl until stiff peaks form. Using a large rubber spatula, gently fold the egg whites through the batter in 2 batches. Gently fold the fresh blueberries into the batter.
4. Melt some butter on a hot griddle pan over medium-low heat. Ladle the batter onto the griddle (you should be able to fit 3 hotcakes at a time) and cook for about 3 minutes per side, or until the hotcakes puff, become golden brown, and are just cooked through.
5. Transfer the hotcakes to plates. Spoon the warm blueberry compote over the hotcakes, and then top with a dollop of butter

Serve immediately.
(... and you will immediately become very popular!)


signature,pineapple hill
Photobucket

Thursday, November 18, 2010

The Kid's Table

Thanksgiving Tables for Kids

via PBK
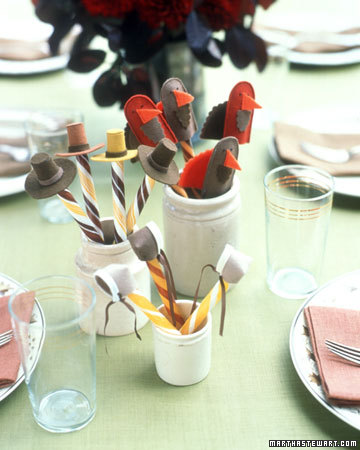
 Finger Puppet Favors
via Martha Stewart
Click HERE for instructions 


via Country Living
To accommodate your youngest guests' abbreviated attention spans (and your desire to linger over dessert), cover the children's dining surface with kraft paper and set out pots of crayons for tic-tac-toe. Bonus: This tablecloth is a cinch to clean up. Stamped birch name cards ensure kids feel as special as grown-ups. 

Turkey Trivia Place Card

via Martha Stewart
These place cards beckon kids to their seats and give them something to think about while the turkey is being carved.
Go HERE to make these 


 Too Cute!
via HipHipHooray Blog


via Tip Junkie


 The Paper Bag Turkey
via One Charming Party

 Tutorial HERE


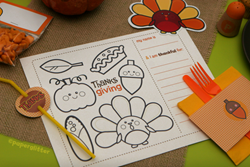
Print this free Thanksgiving kit 
from PaperGlitter
image via South Shore Mamas
 
via fiskars
 Get the details HERE 
 
signature,pineapple hill
Photobucket

Wednesday, November 17, 2010

Corn & Candle?

Simple Centerpiece for Thanksgiving


via BHG
Elevate a basic pillar candle to Thanksgiving-worthy status. Hot-glue ears of Indian corn around a pillar candle and tie twine around the arrangement. For a more elegant look, substitute pretty satin ribbon for the twine.


signature,pineapple hill
Photobucket

Tuesday, November 16, 2010

Tuesday Tip - Cuff Link in a Pinch


The Inspired Cuff Link
 When you’re wearing a French-cuffed shirt, substitute a snip of ribbon for cuff links to keep your sleeves closed. Just slide a piece of ribbon through and tie a knot on each end. They’ll stop your arms from getting a chill and add a little color to a wardrobe staple.


signature,pineapple hill
Photobucket
Share |

Tuesday, November 9, 2010

Tuesday Tip

Dry Cutting Board
via Real Simple

Revive your board by gently warming a bottle of pure mineral oil (available at drugstores) in a bowl of hot water, then wiping the oil onto the surface with a soft cloth. Wipe off the excess four to six hours later.

signature,pineapple hill
Photobucket
Share |

Monday, November 8, 2010

For You Pumpkin


 FABULOUS
Pumpkin Recipes
via Paul Deen


 * ~ * ~ * ~ * ~ * ~ * ~ * ~ *
Pumpkin Pie

Paula's Pumpkin Pie
Ingredients:
1 (8-ounce) package cream cheese, softened
2 cups canned pumpkin, mashed
1 cup sugar
1/4 teaspoon salt
1 egg plus 2 egg yolks, slightly beaten
1 cup half-and-half
1/4 cup (1/2 stick) melted butter
1 teaspoon vanilla extract
1/2 teaspoon ground cinnamon
1/4 teaspoon ground ginger, optional
1 piece pre-made pie dough
Whipped cream, for topping

Directions

Preheat the oven to 350 degrees F.
Place 1 piece of pre-made pie dough down into a (9-inch) pie pan and press down along the bottom and all sides. Pinch and crimp the edges together to make a pretty pattern. Put the pie shell back into the freezer for 1 hour to firm up. Fit a piece of aluminum foil to cover the inside of the shell completely. Fill the shell up to the edges with pie weights or dried beans (about 2 pounds) and place it in the oven. Bake for 10 minutes, remove the foil and pie weights and bake for another 10 minutes or until the crust is dried out and beginning to color.
For the filling, in a large mixing bowl, beat the cream cheese with a hand mixer. Add the pumpkin and beat until combined. Add the sugar and salt, and beat until combined. Add the eggs mixed with the yolks, half-and-half, and melted butter, and beat until combined. Finally, add the vanilla, cinnamon, and ginger, if using, and beat until incorporated.
Pour the filling into the warm prepared pie crust and bake for 50 minutes, or until the center is set. Place the pie on a wire rack and cool to room temperature. Cut into slices and top each piece with a generous amount of whipped cream.
Servings: 6 to 8 servings
Prep Time:
Cook Time: 50 min
 * ~ * ~ * ~ * ~ * ~ * ~ * ~ *
Aunt Trina’s Holiday Pumpkin Crunch

Aunt Trina’s Holiday Pumpkin Crunch  

An old Alabama favorite given to Paula from her Aunt Trina.

Ingredients:

1 (15 oz.) can fresh pumpkin
1 (12 oz.) can evaporated milk
1 teaspoon cinnamon
1 c. sugar
3 eggs, beaten
1 box yellow cake mix
1 cup chopped pecans
2 sticks butter, cut into pieces
FROSTING:
1 (8 oz.) pkg. softened cream cheese
1 cup Heavy Whipping Cream
1/2 cup powdered sugar
1/2 teaspoon cinnamon

Directions

In a large mixing bowl, whisk together pumpkin, evaporated milk, cinnamon and sugar until well combined.  Add eggs and mix well.
Pour mixture into a 9X13 baking dish prepared with a non stick spray. Sprinkle cake mix evenly over entire top. Sprinkle nuts evenly over cake mix and top with butter pieces.  Bake at 350º F for 50-60 minutes.  Set aside to cool.
Prepare frosting while cake is cooling.  In a large mixing bowl using a hand mixer, whip cream cheese until light.  Add in whipping cream and continue to whip until fully combined and thickening.  Add powdered sugar and cinnamon and whip until smooth.
To Serve:  Scoop out a slice of the pumpkin crunch and top with a dollop of the cream cheese frosting, or frost the entire pumpkin crunch with the frosting.
Recipe Courtesy of Paula Deen
Servings: 8
Prep Time: 10 min
Cook Time: 1 hour
signature,pineapple hill
Photobucket