Showing posts with label Projects. Show all posts
Showing posts with label Projects. Show all posts
Thursday, October 10, 2013





Wednesday, October 3, 2012

Wednesday, June 6, 2012
Retro Dad
Retro Father's Day Clip-Art Labels
1. Download designs. Print them onto plain or self-adhesive paper, enlarging or reducing the size as desired.
2. Affix labels to cellophane bags filled with treats, jars of homemade goodies, or store-bought products. Use double-sided tape if your labels are on plain, not self-adhesive, paper.
 |
| via Martha Stewart Living, June 2010 |
He'll go nuts for personalized pistachios -- or pickles or hot sauce. In fact, these retro labels make it a cinch to turn any of Dad's favorite foods into a custom gift for Father's Day.
How-To1. Download designs. Print them onto plain or self-adhesive paper, enlarging or reducing the size as desired.
2. Affix labels to cellophane bags filled with treats, jars of homemade goodies, or store-bought products. Use double-sided tape if your labels are on plain, not self-adhesive, paper.
Monday, March 19, 2012
Embellished Easter Eggs
Dressed Up Eggs
Transform wooden eggs into charming Easter gifts or special decorations
that you can display for years to come—no dye required!
 |
| Project via All You |
You will need:
(makes 1 egg)
- Cloth measuring tape
- Ruler
- Wooden craft egg (at craft stores and (amazon.com)
- 6" x 6" sheet patterned origami paper (at craft stores and amazon.com)
- Pencil
- Small, sharp scissors such as embroidery or cuticle scissors
- Small fine-tipped or foam paintbrush
- Craft glue such as Mod Podge
1. Measure length and circumference of craft egg. Add ¼" to length measurement and 1/8" to circumference measurement. Use these measurements and ruler to draw a rectangle on origami paper. Cut out rectangle.
2. Fold rectangle in half lengthwise so patterned side faces inward. Use pencil and ruler to draw a line parallel to fold and ¼" above it.
3. Lay ruler along long edge of rectangle, opposite fold. Mark off ¼" increments down entire edge.
4. At each ¼" mark, cut into paper (through both layers) toward fold, being careful not to cut beyond the line above fold. Unfold paper.
5. Use brush to apply thin coat of craft glue down fold line of paper's plain side. Wrap paper lengthwise around center of egg, patterned side out and cut strips facing up and down; press against egg to adhere.
6. Beginning with top half of egg, cut one strip so it just reaches tip of egg. Brush underside of strip with glue, and press gently to adhere to egg. Work carefully to achieve a neat, attractive result.
7. Repeat Step 6 on every other paper strip on top half, smoothing each into place on egg as you go.
8. Once every other strip on top half of egg has been glued into place, repeat process with remaining strips on that half, trimming strips as necessary to fit spaces. Once all strips on top half have been glued, apply a thin coat of glue over entire half of egg to seal.
9. Repeat Steps 6 through 8 on bottom half of egg. Allow egg to dry completely (until it no longer feels tacky) before displaying.
Thursday, February 2, 2012

Monday, January 30, 2012
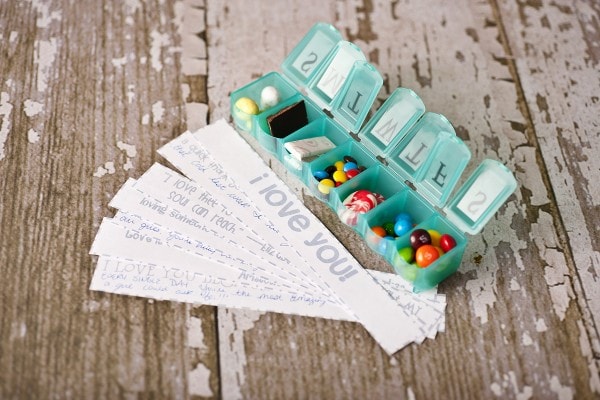
7 Days of Love
A Sweet Little Gift for Your Valentine
♥ ♥ ♥ ♥ ♥ ♥ ♥ ♥ ♥ ♥ ♥ ♥ ♥ ♥ ♥ ♥ ♥ ♥ ♥ ♥ ♥ ♥ ♥ ♥ ♥ ♥ ♥
7 Days of Love
♥ ♥ ♥ ♥ ♥ ♥ ♥ ♥ ♥
This adorable idea is from
♥ ♥ ♥ ♥ ♥ ♥ ♥ ♥ ♥

♥ ♥ ♥ ♥ ♥ ♥ ♥ ♥ ♥
You can find the “how-to”
and free printable
♥ ♥ ♥ ♥ ♥ ♥ ♥ ♥ ♥

Thursday, January 26, 2012


Monday, January 16, 2012
Valentine Treat Cups
Valentine Treat Cups
 |
via Martha Stewart
(The Martha Stewart Show, February 2009) |
Fill plastic cups with delicious candies, then wrap with crepe paper in complementary hues for a sweet gift.
Tools and Materials:
- 8-ounce clear Solo cup and 8-ounce cup template or
- 12-ounce clear Solo cup and 12-ounce cup template or
- Dixie cup and Dixie cup template
- Card stock
- Scissors
- Edge punch
- Craft knife
- Double-sided tape
- Double-sided crepe paper
- Candy
- Gold trim
- Gold ribbon or rope
- Embellishments
Valentine Treat Cup How-To:
1. Print your chosen template on card stock. Cut out with scissors.
2. Punch along dashed line edge with edge punch.
3. Cut out heart shape from center of card stock piece with a craft knife.
4. Wrap card stock around cup and secure with double-sided tape.
Tip: Gently curve card stock with your hands first to avoid the paper cracking and folding when wrapped around cup.
5. Cut a 12-by-12-inch piece of double-sided crepe paper in half. Place double-sided tape along one long edge and wrap this edge around top of cup.
6. Glue gold trim around cup where the crepe paper meets the card stock.
7. Fill cup with candy. Gather crepe paper and tie closed with gold rope. Add embellishments.
Tuesday, October 25, 2011
Tuesday Tip-Halloween Tips
Halloween Safety Tips

Halloween is right around the corner. Thousands of children will be out and about that night collecting their bags of goodies. As much fun as those kids will have, Halloween night requires parents to be extra vigilant with their safety.
By following these simple tips, you’ll greatly diminish your child’s risk of injury.
- Ensure your child has light reflectors on them to make them more visible in the dark.
- Keep your child in your sight. That will allow you to monitor where they are.
- Don’t allow teenagers to go out alone. Make sure they are in a group of kids. There’s safety in numbers.
- Make sure older children who go out with their friends have their cell phone. Have them check in with you periodically.
- Trick or treat in neighborhoods you are familiar with. Being caught out after dark in an area you don’t know is never a good idea.
- When you return home, before your child enjoys their treats, check the candy to make sure it hasn’t been tampered with.
- When your trick or treating with your children, be aware of where you are and who is around you. While Halloween is supposed to be a night of light-hearted fun for children, there are those who will take advantage of the anonymity of the costumes.

Halloween is a wonderful opportunity for families to spend quality time together indulging in carefree fun. There’s a pure joy in the shrieks and peals of laughter of children as they see the decorations and costumes. You’ll have a timeless memory as you watch your child race up the sidewalk anticipating the candy they’ll receive.
Children grow up so fast. Before you know it they’ll be hanging out with their friends. So enjoy this Halloween but do it safely.

Halloween Treat Tips
an inkling of the goodies you'll find
 |
 |
just in time
8 Tips
for last minute
(never)
Halloween Hosts

more Halloween ideas
at


Subscribe to:
Posts (Atom)