Why Pineapple Hill?

The pineapple has been a symbol of hospitality since the days of the early American colonies. According to legend, the symbol began with the sea captains of New England who would spear a pineapple on a fence post outside their home to let the community know of their safe return home and to invite friends to visit and share their hospitality.

Likewise, we hope Pineapple Hill Designs boutique will make you feel “Welcome”! We know how important it is to find something special for that certain someone or just the right accessory to complete a room. We believe everyday is a day to celebrate, and we have just the thing to help you create something special out of the ordinary.
Showing posts with label Tutorial. Show all posts

Friday, March 20, 2015

DIY Easter Wreath


Almond Easter Wreath


This Colorful Candy Wreath comes together
in a short time and don't you thing the Egg-shaped Jordan almonds
make an especially sweet spring decoration!
**********************************
Step 1: Take a 12-inch Styrofoam wreath, and beginning with the inside circumference, hot-glue the almonds in place, overlapping a few of them to add dimension.
Step 2: Continue in a circular pattern until the entire front and inner and outer edges of the wreath are covered.
Step 3: Hang with a sturdy piece of cotton ribbon, or oversize rickrack trim as shown.
To store the wreath, wrap it in paper, place flat in a box, and keep in a cool, dry spot. It should last for one to two years.
See the full tutorial here on Country Living.


Photobucket

Share |

Monday, March 19, 2012

Embellished Easter Eggs

Dressed Up Eggs
Transform wooden eggs into charming Easter gifts or special decorations
that you can display for years to come—no dye required!
Project via All You

You will need:
   (makes 1 egg)
 
  • Cloth measuring tape
  • Ruler
  • Wooden craft egg (at craft stores and (amazon.com)
  • 6" x 6" sheet patterned origami paper (at craft stores and amazon.com)
  • Pencil
  • Small, sharp scissors such as embroidery or cuticle scissors
  • Small fine-tipped or foam paintbrush
  • Craft glue such as Mod Podge
1.  Measure length and circumference of craft egg. Add ¼" to length measurement and 1/8" to circumference measurement. Use these measurements and ruler to draw a rectangle on origami paper. Cut out rectangle.

2.   Fold rectangle in half lengthwise so patterned side faces inward. Use pencil and ruler to draw a line parallel to fold and ¼" above it.

3.   Lay ruler along long edge of rectangle, opposite fold. Mark off ¼" increments down entire edge.

4.   At each ¼" mark, cut into paper (through both layers) toward fold, being careful not to cut beyond the line above fold. Unfold paper.

5.   Use brush to apply thin coat of craft glue down fold line of paper's plain side. Wrap paper lengthwise around center of egg, patterned side out and cut strips facing up and down; press against egg to adhere.

6.   Beginning with top half of egg, cut one strip so it just reaches tip of egg. Brush underside of strip with glue, and press gently to adhere to egg. Work carefully to achieve a neat, attractive result.

7.  Repeat Step 6 on every other paper strip on top half, smoothing each into place on egg as you go.

8.   Once every other strip on top half of egg has been glued into place, repeat process with remaining strips on that half, trimming strips as necessary to fit spaces. Once all strips on top half have been glued, apply a thin coat of glue over entire half of egg to seal.

9.   Repeat Steps 6 through 8 on bottom half of egg. Allow egg to dry completely (until it no longer feels tacky) before displaying.


Photobucket
Share |

Thursday, February 2, 2012

Valentine Craft Idea


Make Valentine's Day cards 
out of paint strips — in seconds.


via Country Living
 
 
Instructions
HERE


Photobucket
Share |

Monday, January 30, 2012

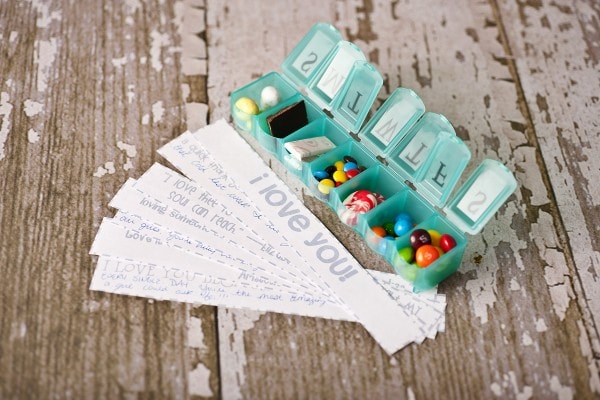
7 Days of Love

A Sweet Little Gift for Your Valentine
    ♥  ♥      ♥  ♥      ♥  ♥    
 7 Days of Love 


This adorable idea is from


You can find the “how-to”
and free printable


Photobucket
Share |

Thursday, January 26, 2012

"52 Reasons I Love You" Cards Tutorial

"52 Reasons I Love You"
Cards Tutorial
This is such a great idea! 

Spotted at 
You can get the "how-to"


Photobucket
Share |

Friday, January 13, 2012

Happy 2012 !


The Olde Pink HouseWedding by Cheryl Joy Miner Photography


There’s just nothing like a sweet, sweet love story to fill the weekend 
with happy and this darling Savannah affair 
by Cheryl Joy Miner Photography is sure to leave you smiling 
’til Monday with a bundle of heartwarming moments 
and one VERY adorable bride and groom. 


You can see more from the Style Me Pretty article


Happy Wishes for the New Year
from Pineapple Hill!

via Pinterest

2012 - Make it Happen


Photobucket
Share |

Wednesday, November 9, 2011

Getting Ready for Thanksgiving


via purple onion

Cute Thanksgiving Place Cards

via Holly Mathis Interiors

Remember these from last year:
via Martha Stewart

To help you create decorative place cards for the Thanksgiving table,
Martha Stewart has free clip art. Download and print the place cards
(cream or neutral-colored card stock will work best),
cut along the dotted line, inscribe your guest's name,
and score down the middle with a bone folder.
You can also make a flat card with a border by using double-sided tape to affix the place-card design to a piece of card stock 1/4 inch larger than the place card. You can punch a hole in it and use twine to tie it to a napkin, or simply tuck it into the napkin.

via picky palate

note from Jenny at Picky Palate: 
Another simple recipe that’s perfect for brunch or any 
time of  day for that matter.  The cream cheese frosting on top is good enough to keep on hand for dipping fruit or crackers.

Pumpkin Spiced Cream Cheese Breakfast Rolls
Rolls:

  • 2 packages/cans Pillsbury Crescent Rolls
  • 4 0z cream cheese, softened
  • 1/4 Cup brown sugar
  • 1/4 Cup canned pumpkin (Libby’s)
  • 1/4 teaspoon ground cinnamon
  • 1/8 teaspoon fresh ground nutmeg


  1. Preheat oven to 350 degrees F.  Unroll crescent rolls to form 4 rectangles placed side by side.  Pinch seams together to form one long rectangle.  Place cream cheese, brown sugar, pumpkin, cinnamon and nutmeg into a mixer; beat until well combined.  Spread mixture over crescents leaving a 1/2 inch border around edges.  Starting at long end, roll up then cut into 1 inch pieces.  Place around 2 9 inch cake pans that have been sprayed with cooking spray.  I left the centers open so the rolls form a circle.
  2. Bake for 28-30 minutes or until rolls are golden brown.  Remove and let cool for 10 minutes.  Frost warm rolls with cream cheese frosting recipe below.

Frosting
  • 4 oz softened cream cheese
  • 1/2 Cup powdered sugar
  • 1/2 teaspoon vanilla
  • 1 Tablespoon canned pumpkin (Libby’s)


 Mix all ingredients into a large bowl until smooth.  Spread over warm rolls.


Photobucket

Share |

Saturday, October 29, 2011

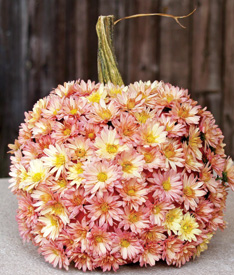
Pretty Pumpkin

Pretty Pumpkin
via Southern Lady

Just gather your seasonal flower of choice

(try daisies or mums), and poke holes into

the pumpkin wherever you want blooms to 

be placed. Then cut stems of flowers short,
and insert into the holes.


signature,pineapple hill
Photobucket

Tuesday, October 25, 2011

Tuesday Tip-Halloween Tips


Halloween Safety Tips

Halloween is right around the corner. Thousands of children will be out and about that night collecting their bags of goodies. As much fun as those kids will have, Halloween night requires parents to be extra vigilant with their safety.
By following these simple tips, you’ll greatly diminish your child’s risk of injury.
  • Ensure your child has light reflectors on them to make them more visible in the dark.
  • Keep your child in your sight. That will allow you to monitor where they are.
  • Don’t allow teenagers to go out alone. Make sure they are in a group of kids. There’s safety in numbers.
  • Make sure older children who go out with their friends have their cell phone. Have them check in with you periodically.
  • Trick or treat in neighborhoods you are familiar with. Being caught out after dark in an area you don’t know is never a good idea.
  • When you return home, before your child enjoys their treats, check the candy to make sure it hasn’t been tampered with.
  • When your trick or treating with your children, be aware of where you are and who is around you. While Halloween is supposed to be a night of light-hearted fun for children, there are those who will take advantage of the anonymity of the costumes.

Halloween is a wonderful opportunity for families to spend quality time together indulging in carefree fun. There’s a pure joy in the shrieks and peals of laughter of children as they see the decorations and costumes. You’ll have a timeless memory as you watch your child race up the sidewalk anticipating the candy they’ll receive.

Children grow up so fast. Before you know it they’ll be hanging out with their friends. So enjoy this Halloween but do it safely.

Halloween Treat Tips
A favorite source: 

an inkling of the goodies you'll find


just in time

8 Tips
for last minute
(never)
Halloween Hosts


more Halloweeideas
at

a free printable 
Happy Halloween!

signature,pineapple hill
Photobucket
Share |