We found a fun Halloween Printable
 |
|
|


 |
| via Tea Time Magazine |
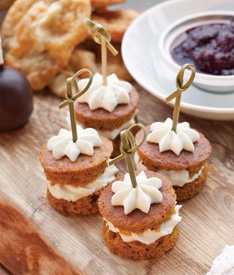
PUMPKIN CAKES
Makes 48 to 60 mini cakes 1 (15-ounce) can pumpkin puree 3 large eggs 1 cup vegetable oil 1 teaspoon vanilla extract 2 1/2 cups all-purpose flour 2 1/2 cups sugar 1 teaspoon baking soda 1 teaspoon ground nutmeg 1 teaspoon ground allspice 1 teaspoon ground cinnamon 1 teaspoon ground cloves 1/4 teaspoon salt Garnish: decorative skewers or picks 1. Preheat oven to 350°. Line a rimmed 18x12-inch baking sheet with parchment paper. Set aside. 2. In a large mixing bowl, beat pumpkin, eggs, oil, and vanilla at medium speed with an electric mixer until ingredients are well mixed. Set aside. 3. In a medium bowl, combine flour, sugar, baking soda, nutmeg, allspice, cinnamon, cloves, and salt, whisking until well blended. 4. Add flour mixture to pumpkin mixture, beating until just combined. Pour batter onto prepared baking sheet, smoothing with an offset spatula. 5. Bake until a toothpick inserted in the center comes out clean, 17 to 18 minutes. Cool in pan. Freeze for 4 hours. 6. Using a 1 1/2-inch round cutter, cut as many circles from frozen cake as possible, avoiding edges. Slice frozen cake circles in half horizontally. Set aside. 7. Place Cream Cheese Frosting in a pastry bag fitted with a medium star tip. Pipe frosting onto bottom halves of cake circles. Top with remaining cake halves. Pipe a star on top of each mini cake. 8. Garnish each mini cake with a decorative skewer or pick, if desired.
CREAM CHEESE FROSTING
(from Country Living Magazine)
Ingredients
· 1 package(s) (8-ounce) Cream Cheese, softened
· 1/4 cup(s) Pumpkin Purée
· 1/4 cup(s) (1/2 stick) Unsalted Butter, softened
· 1 tablespoon(s) Fresh Orange Juice
· 1 teaspoon(s) Grated Orange Zest
· 1/2 teaspoon(s) Pure Vanilla Extract
· 4 cup(s) Confectioners' Sugar, sifted
Directions:
Blend the cream cheese, pumpkin purée, butter, orange juice, zest, and vanilla in a large bowl using an electric mixer set at medium speed until smooth. Add the sugar and continue to beat until light and creamy -- about 5 more minutes.
|
 | ||
Featured Blog: Digital Reflections50 Fun Fall Activities
There is so much to enjoy about Fall and so many opportunities to create memories, traditions and just have good time. Here is our list for this Fall, given the number of days from Oct. 1st to Thanksgiving, this is pretty much an activity a day type of list. Hope you enjoy the list, and check back every so often for more details on the ideas, and photos of our projects.
1. Take a Nature Walk
2. Collect leaves, identify, sort and do leaf rubbings.
5. Use items from your nature walk, to create a Fall sensory board/Nature Table.
6. Visit an Apple Orchard
7. Collect variety of apples and use for matching, sorting, addition, subtraction.
9. Bake apple pies, or apple cakes and deliver to somone who is under the weather, or in need of some cheering up.
10. Make homeade apple cider, package up dry ingredients for gifts for the mail man, librarian, teachers.
14. Go to a Fall Festival.
15. Go to a Pumpkin Patch.
16. Host a Pumkin Carving Party.
17. Paint Pumpkin faces.
19. Bake pumpkin pies.
21. Make playdough apples and pumpkins.
23. Plan a neighborhood EyeSpy with a list of Fall items.
25. Go to a farmers market.
26. Visit a petting zoo.
27. Knit scarves or hats for a Fall/Winter Clothing Drive.
28. Participate in a Canned food drive.
29. Enjoy a Fall Picnic.
30. Make hand and feet print art and tuck away after the Fall season each year.
31. Host a Halloween party, complete with costume contest, bobbing for apples, and a cake walk.
32. Host story time at your house, and pull out your favorite Fall books.
34. Make your own TickTac Toe and use all sorts of manipulatives found on your various fall outings, from acorns to small leaves, stones, or minipumpkins from the craft store.
35. Rake a neighbors yard.
37. Dry fruit for snack time.
38. Make 4 season posters (use a painted hand and wrist for the tree and let the kids paint the scenery and tree according to the season.)
39. Create a countdown to Thanksgiving calendar.
40. Make A Thankgiving Tree, and each day have the kids write one thing they are thankful for and on Thanksgiving day, everyone reads the tree and is reminded of all their blessings.
43. Visit a planetarium, read about the seasons and weather patterns and space.
44. Take a photowalk around your neighborhood and let the kids take photos of the seasonal changes and then create a collage with their photos.
45. Create beautiful Fall Mixed Media pieces (i love these ideas and this blog is a family favorite).
46. Visit the library and check out Fall themed books.
47. Camp Out in your backyard.
49. Can some jam, veggies, sauces to store up for the winter (introduce your children to hibernation and get some books on animal habitats.)
50. Do one thing each day that relates to the season, bake bread, take a walk, enjoy the crisp air, read a Fall related book, everyday is an opportunity to create memories, spark creativity and enjoy the treasure that life is.
|
 |
| via Southern Lady |
 |
| via Country Living ingredients
|


www.flickr.com
|


