
Showing posts with label Valentine. Show all posts
Showing posts with label Valentine. Show all posts
Thursday, February 2, 2012

Wednesday, February 1, 2012
Thursday, January 26, 2012


Thursday, January 19, 2012
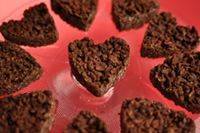
Valentine's Day Recipe
Raspberry Ice Cream Sandwiches
{ makes 6 servings }
1 container (quart size) vanilla ice cream
1 cup raspberries (slightly mashed)
8 oz butter (softened)
3/4 cup caster sugar
2 tsp vanilla extract
1 egg yolk
2 1/4 cups plain flour (sifted)
1 cup raspberries (slightly mashed)
8 oz butter (softened)
3/4 cup caster sugar
2 tsp vanilla extract
1 egg yolk
2 1/4 cups plain flour (sifted)
Prepare the Raspberry Ice Cream
Allow the ice cream to soften a little before transferring to a bowl and stirring through the raspberries. Using a spatula, smooth the mixture into a rectangular container about 1 inch deep, lined with baking paper, and freeze overnight.
Allow the ice cream to soften a little before transferring to a bowl and stirring through the raspberries. Using a spatula, smooth the mixture into a rectangular container about 1 inch deep, lined with baking paper, and freeze overnight.
Bake the Vanilla Cookies
Beat the butter and sugar with an electric mixer until pale and creamy. Add the vanilla and egg yolk and beat to combine. Beat in the flour until a smooth dough forms. Wrap in plastic and place in the fridge for 30 minutes, or until firm. Meanwhile, preheat the oven to 350 F and line a baking tray with paper.
Beat the butter and sugar with an electric mixer until pale and creamy. Add the vanilla and egg yolk and beat to combine. Beat in the flour until a smooth dough forms. Wrap in plastic and place in the fridge for 30 minutes, or until firm. Meanwhile, preheat the oven to 350 F and line a baking tray with paper.
Roll the dough out between two sheets of paper until 1/4 inch thick. Using a round, fluted 1 inch cookie cutter, cut 12-14 rounds. Bake for 15-20 minutes, or until golden brown. Cool for 10 minutes on the tray, then pop them into the freezer until ice-cold.
Assemble the Sandwiches
Using the same fluted cookie cutter, cut 6 rounds of raspberry ice cream (you may wish to run the cutter under hot water first to make this easier!). Carefully sandwich the ice cream rounds between two vanilla cookies and ta-da, you're all set for Valentine's Day dessert.
Using the same fluted cookie cutter, cut 6 rounds of raspberry ice cream (you may wish to run the cutter under hot water first to make this easier!). Carefully sandwich the ice cream rounds between two vanilla cookies and ta-da, you're all set for Valentine's Day dessert.
p.s. Store them in the freezer wrapped in baking paper for up to a week.
Monday, January 16, 2012
Valentine Treat Cups
Valentine Treat Cups
 |
via Martha Stewart
(The Martha Stewart Show, February 2009) |
Fill plastic cups with delicious candies, then wrap with crepe paper in complementary hues for a sweet gift.
Tools and Materials:
- 8-ounce clear Solo cup and 8-ounce cup template or
- 12-ounce clear Solo cup and 12-ounce cup template or
- Dixie cup and Dixie cup template
- Card stock
- Scissors
- Edge punch
- Craft knife
- Double-sided tape
- Double-sided crepe paper
- Candy
- Gold trim
- Gold ribbon or rope
- Embellishments
Valentine Treat Cup How-To:
1. Print your chosen template on card stock. Cut out with scissors.
2. Punch along dashed line edge with edge punch.
3. Cut out heart shape from center of card stock piece with a craft knife.
4. Wrap card stock around cup and secure with double-sided tape.
Tip: Gently curve card stock with your hands first to avoid the paper cracking and folding when wrapped around cup.
5. Cut a 12-by-12-inch piece of double-sided crepe paper in half. Place double-sided tape along one long edge and wrap this edge around top of cup.
6. Glue gold trim around cup where the crepe paper meets the card stock.
7. Fill cup with candy. Gather crepe paper and tie closed with gold rope. Add embellishments.
Friday, February 4, 2011
Itty Bitty Valentines
I totally fell for these cute & tiny little Valentine Boxes.
Aren't they adorable!
If you want to make some head on over to her BLOG.
There you'll find detailed instructions.
By the way ~ Brooke's post was featured at Brides.com.
You can even print the paper
HERE
to do your own.

You can even print the paper
HERE
to do your own.


Thursday, February 3, 2011
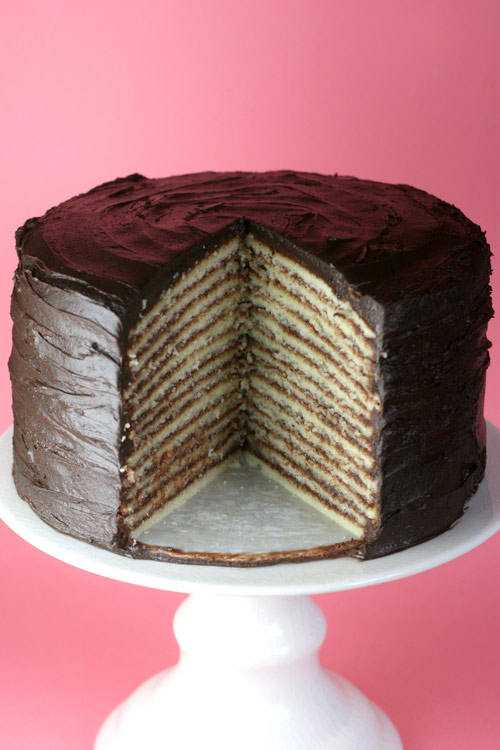
Chocolate Cherry Stack Cake
oChocolate Cherry Stack Cakeo
 |
| via BHG |
Makes: 8 servings Prep: 40 minutesBake: 22 minutesCool: 10 minutes
Ingredients
- 3/4 cup plus 1 tsp. all-purpose flour
- 1/3 cup plus 1 tsp. unsweetened cocoa powder
- 1 tsp. baking powder
- 1/2 tsp. baking soda
- 1/2 tsp. ground cinnamon
- 1/4 tsp. salt
- 1/3 cup unsalted butter, softened
- 3/4 cup sugar
- 2 eggs
- 1 tsp. vanilla
- 1/2 cup sour cream
- 1 Recipe Cherry or Chocolate Frosting, recipe below
- 1 Recipe Chocolate-Dipped Cherries, recipe below (optional)
Directions
1. Preheat the oven to 350 degrees F. Grease two 6x2-inch round cake pans or springform pans. Mix 1 teaspoon each flour and cocoa powder; dust pans. Set pans aside.2. In bowl combine 3/4 cup flour, 1/3 cup cocoa powder, baking powder, baking soda, cinnamon, and salt; set aside.
3. In large bowl with electric mixer beat butter on medium to high for 30 seconds. Add sugar; beat until smooth and fluffy. Beat in eggs and vanilla until smooth. Beat in sour cream and flour mixture. Pour batter in pans; spread evenly.
4. Bake 22 to 26 minutes or until top springs back when lightly touched and edges begin to pull away from sides of pan. Cool in pans on wire rack 10 minutes. Remove from pans; cool on rack.
5. Use serrated knife to horizontally cut cakes in half to make 4 layers total. Place bottom layer on plate; spread with 2/3 cup frosting. Repeat with layers. Place top layer on cake. Heap remaining frosting, swirling in peaks. Refrigerate. To serve, top with Chocolate-Dipped Cherries. Serves 8.
Cherry Frosting: In chilled large mixing bowl combine one 8-ounce carton sour cream. 1 cup whipping cream (do not use ultra-pasteurized whipping cream), 1-1/2 cups powdered sugar, and 2 tablespoons maraschino cherry juice. Beat with chilled beaters on medium-high until fluffy, about 3 to 5 minutes.
Chocolate Frosting:In a chilled large mixing bowl combine one 8-ounce carton sour cream, 1 cup whipping cream (do not use ultra-pasteurized whipping cream), 1-1/2 cups powdered sugar, and 1/4 cup sifted unsweetened cocoa powder. Beat with chilled beaters on medium-high until fluffy, about 3 to 5 minutes.
Chocolate-Dipped Cherries: Drain 16 maraschino cherries with stems; pat dry with paper towels. In small microwave-safe bowl combine 1/2 cup semisweet chocolate pieces and 1 teaspoon shortening. Cook on 50 percent power (medium) 1-1/2 to 2 minutes or until melted, stirring once. Dip cherries in chocolate; place on waxed paper until set. Store, covered, up to 24 hours.
Saturday, January 22, 2011
Valentine's Day Pistachio Wreath
Pistachio Wreath
 |
From Martha Stewart Living, February 1996 |
Dyed pistachios -- and the telltale red lips and fingers you get from eating them -- went out of fashion in the seventies.
Now they're back, this time as part of a valentine wreath.
Begin by making a pattern: Cut a symmetrical heart from paper (this one is about 8 inches tall), then cut out the middle, leaving a heart-shaped ring with inch-wide edges.
Trace pattern onto thick cardboard for the wreath form and onto red felt for the backing: Cut shapes out, and use household glue to attach the felt to the form.
Color the edges of the cardboard with a red felt-tip pen. Next, heat up a glue gun, and glue pistachios to the cardboard as shown, beginning at the V-shaped top of the heart and pointing the open ends of the shells outward.
Cover the entire cardboard surface. In crevices between the rows of pistachios, dab hot glue to secure pink peppercorns (available at specialty food stores).
Glue a picture hanger on the back, and loop ribbon through.

Don't you l♥ve it!
Sunday, February 14, 2010

Friday, February 12, 2010
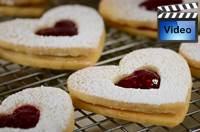
Chocolate Dipped Shortbread Hearts

via Martha Stewart
Tip from Martha:
You may use any size heart cutters you like to make these shortbreads; the chocolate is optional. For the most beautiful cookies, don't reroll the scraps.
Recipe:
Ingredients:
Makes 4 dozen 2 1/2-inch heart cookies
1 cup (2 sticks) unsalted butter
3/4 cup sifted confectioners' sugar
1 teaspoon pure vanilla extract
2 cups sifted all-purpose flour, plus more for dusting
1/2 teaspoon salt
3 ounces semisweet or bittersweet chocolate, finely chopped
1 teaspoon canola oil or pure vegetable shortening
Directions:
1.In the bowl of an electric mixer fitted with the paddle attachment, cream butter, sugar, and vanilla until combined. On slow speed, beat in flour and salt until combined. Wrap dough in plastic wrap; chill until firm, at least 2 hours, or overnight.
2.On a lightly floured surface, roll out the dough until 1/16-to-1/8 inch thick. Cut out hearts with a 2-inch heart cookie cutter. Transfer cookies to an ungreased baking sheet; chill for 30 minutes.
3.Heat oven to 300 degrees with a rack in the center. Press the tines of a fork into each cookie to make designs. Bake until just beginning to brown around the edges, about 18 minutes. (Cookies will keep in an airtight container at room temperature for about 5 days.)
4.In the top of a double boiler or in a heat-proof bowl set over simmering water, melt the chocolate, stirring occasionally. Stir in the oil. Dip half or one third of each cookie into the chocolate mixture. Transfer cookies to a cooling rack to dry, or place them on a piece of parchment paper in the freezer for 10 minutes. Serve.
Saturday, February 6, 2010


Thursday, February 4, 2010
Valentine's Day Desserts
Want to make some yummy valentine treats?I came across these♥Enjoy!Valentine's Day Desserts |
 |  |  |
| Sugar Cookies | Chocolate Cupcakes | Chocolate Brownies |
| These sweet and buttery cut-out cookies are always a favorite for not only can you tailor the shape of the cookie to the occasion but you can also dress them simply with granulated or colored sugars or make them very decorative by frosting them with royal icing. more | These beautiful chocolate cupcakes have a wonderful chocolate flavor and are frosted with a chocolate fudge frosting. more | Chocolate Brownies have a lovely deep chocolate flavor and dense fudge-like texture that are topped with a smooth and glossy Ganache frosting. more |
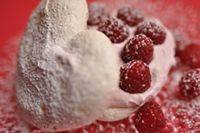 | 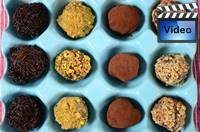 |  |
| Meringue Hearts | Chocolate Truffles | Chocolate Sugar Cookies |
| Since meringues pair so well with fruits and creams, for this dessert I have made individual heart-shaped meringues and topped them with strawberry cream and fresh strawberries. more | These rich and elegant, bite-sized round petit fours are made from a mixture of dark or white chocolate and cream to which various flavorings can be added: butter, liqueurs, extracts, nuts, coffee, purees, spices, candied or dried fruits. more | Chocolate Sugar Cookies are a sweet and buttery cut-out cookie with a mild chocolate flavor that are frosted with royal icing. more |
 |  |  |
| Chocolate Hearts | Shortbread Cookies with White Chocolate & Raspberries | Raspberry Truffle Tart |
| I don't know who likes these better; kids or adults. All you need to make these delicious treats is your favorite milk, dark, or white chocolate and Rice Krispies more | Shortbreads are a buttery cookie (biscuit) that taste absolutely delicious when sandwiched together with raspberry jam and grated white chocolate. more | What could be more enticing than a giant raspberry-flavored truffle set in a biscotti crust.This beautiful raspberry-flavored truffle tart is set in a delicious biscotti crust. more |
This is only the beginning!
Go HERE for more.
 |


Monday, January 25, 2010
Love These
Pocket ♥ Presents
"Itty Bitty Valentines"
"Itty Bitty Valentines"
Decorate matchboxes with romantic designs, then fill with Valentine's treats.

via All You
You’ll need:
- Scissors
- Red, pink and white wrapping paper in assorted solids and patterns
- Craft matchboxes (at ecrater.com)
- Glue stick
- Heart-shaped paper punches in graduated sizes (available at craft stores)
- Pinking shears
- Assorted decorative items, including red baker’s twine (at baking supply stores), small gift tags and
- small adhesive rhinestone strips (at craft stores)
- Small Valentine’s Day candies, such as heart-shaped red hots or red-pink-and-white candy corn
2. Apply glue to the back of wrapping paper. Adhere paper to matchbox, working from one end and pushing out any air bubbles as you go.
3. Using heart-shaped punches in different sizes, make hearts out of wrapping paper. Or cut narrow strips of wrapping paper using pinking shears and make a design by punching out a row of small hearts from strips.
4. Decorate wrapped boxes as desired, using hearts, heart strips, baker’s twine, gift tags and adhesive rhinestone strips.
5. Fill matchboxes with assorted candies.
If you want to see more on this idea go
 via Inchmark
| |

Subscribe to:
Posts (Atom)


